13 KiB
Rotary Phone Audio Guestbook
This project transforms a rotary phone into a voice recorder for use at special events (i.e. wedding audio guestbook, etc.).

Background
I was inspired by my own upcoming wedding to put together a DIY solution for an audio guestbook using a rotary phone. Most online rentals were charging $600 for an experience that didn't even offer the ability to add a custom voice mail and took about 4-6 weeks of turn around time to process the audio after the event. I tried to use as many parts that I had laying around to keep costs down. It worked out quite well and we were able to gather some very special voice messages.
Below you will find a parts list and detailed setup guide. Please feel free to reach out to me with any questions.
Post-Event
Since this was a trial by fire type of scenario there ended up being a few gotchas at the real event which I've since accounted for. Namely setting a time limit on the recording length as we had some youngsters leaving 5+ minute messages repeatedly and this ended up draining the battery. Alternatively, depending on your scenario, it might be preferable to attach directly to a 5V power supply.
Future Work (Action Items)
A few weeks before the wedding I had the code registering dialed numbers from the rotary encoder with the goal of playing back special messages for certain guests who dialed a certain combination (i.e. dial an area code to hear a special message to my old roomates). The details of this operation mode are described in Mode 2 below. In order to activate this mode I had to wait for input when the phone was off the hook. This required an extra step of dialing zero before leaving a normal voice message. In the end we decided to keep it simple and I've thus migrated this code to the dev branch along with the code to run through post-porcessing the audio in a separate process. If any one is interested in expanding this please feel free.
I would also like to thread the audio playback so I can have a monitor/watchdog service terminate the thread upon hook callback so that the message doesn't continue playing once the user hangs up.
Materials
| Part | Notes | Quantity | Cost |
|---|---|---|---|
| rotary phone | Estate/garage/yard sales are probably the best places to find once of these. Ideally one with a phone jack since we will be using these four wires extensively. | 1 | $0.00-$60.00 |
| raspberry pi zero | I didn't realize how hard these are to find these days. You can use any rpi or arduino style single-board computer but be aware of size constraints (i.e. must fit inside the rotary phone enclosure) | 1 | $9.99 |
| raspberry pi zero case | Optional: added for protection. One of the cases on Amazon has a heat-sink cutout which might be nice for better heat dissapation since it will all be enclosed in the end. | 1 | $4.95 |
| micro SD card | Any high capacity/throughput micro SD card that is rpi compatible | 1 | $8.99 |
| USB Audio Adapter | Note: I removed the external plastic shell and directly soldered the wires instead of using the female 3.5mm receptacle. | 1 | $4.95 |
| USB OTG Host Cable - MicroB OTG male to A female | 1 | $2.50 | |
| --- | --- If you don't want to solder anything --- | --- | --- |
| 3.5mm Male to Screw Terminal Connector | Optional: can connect the handset cables directly to the USB audio interface via these screw terminals | 2 | $1.37 |
| --- | --- If running off a battery --- | --- | --- |
| LiPo Battery | Optional: maximize capacity based on what will fit within your rotary enclosure. | 1 | $12.50 |
| LiPo Shim | Optional: if you plan to run this off a LiPo I would recommend something like this to interface with the rpi zero. | 1 | $9.95 |
| LiPo Charger | Optional: for re-charging the LiPo. | 1 | $6.95 |
| --- | --- If replacing the built-it microphone --- | --- | --- |
| LavMic | Optional: if you'd like to replace the carbon microphone. This is an omnidirectional lavalier mic and outputs via a 3.5mm TRS | 1 | $24.95 |
Hardware
Wiring
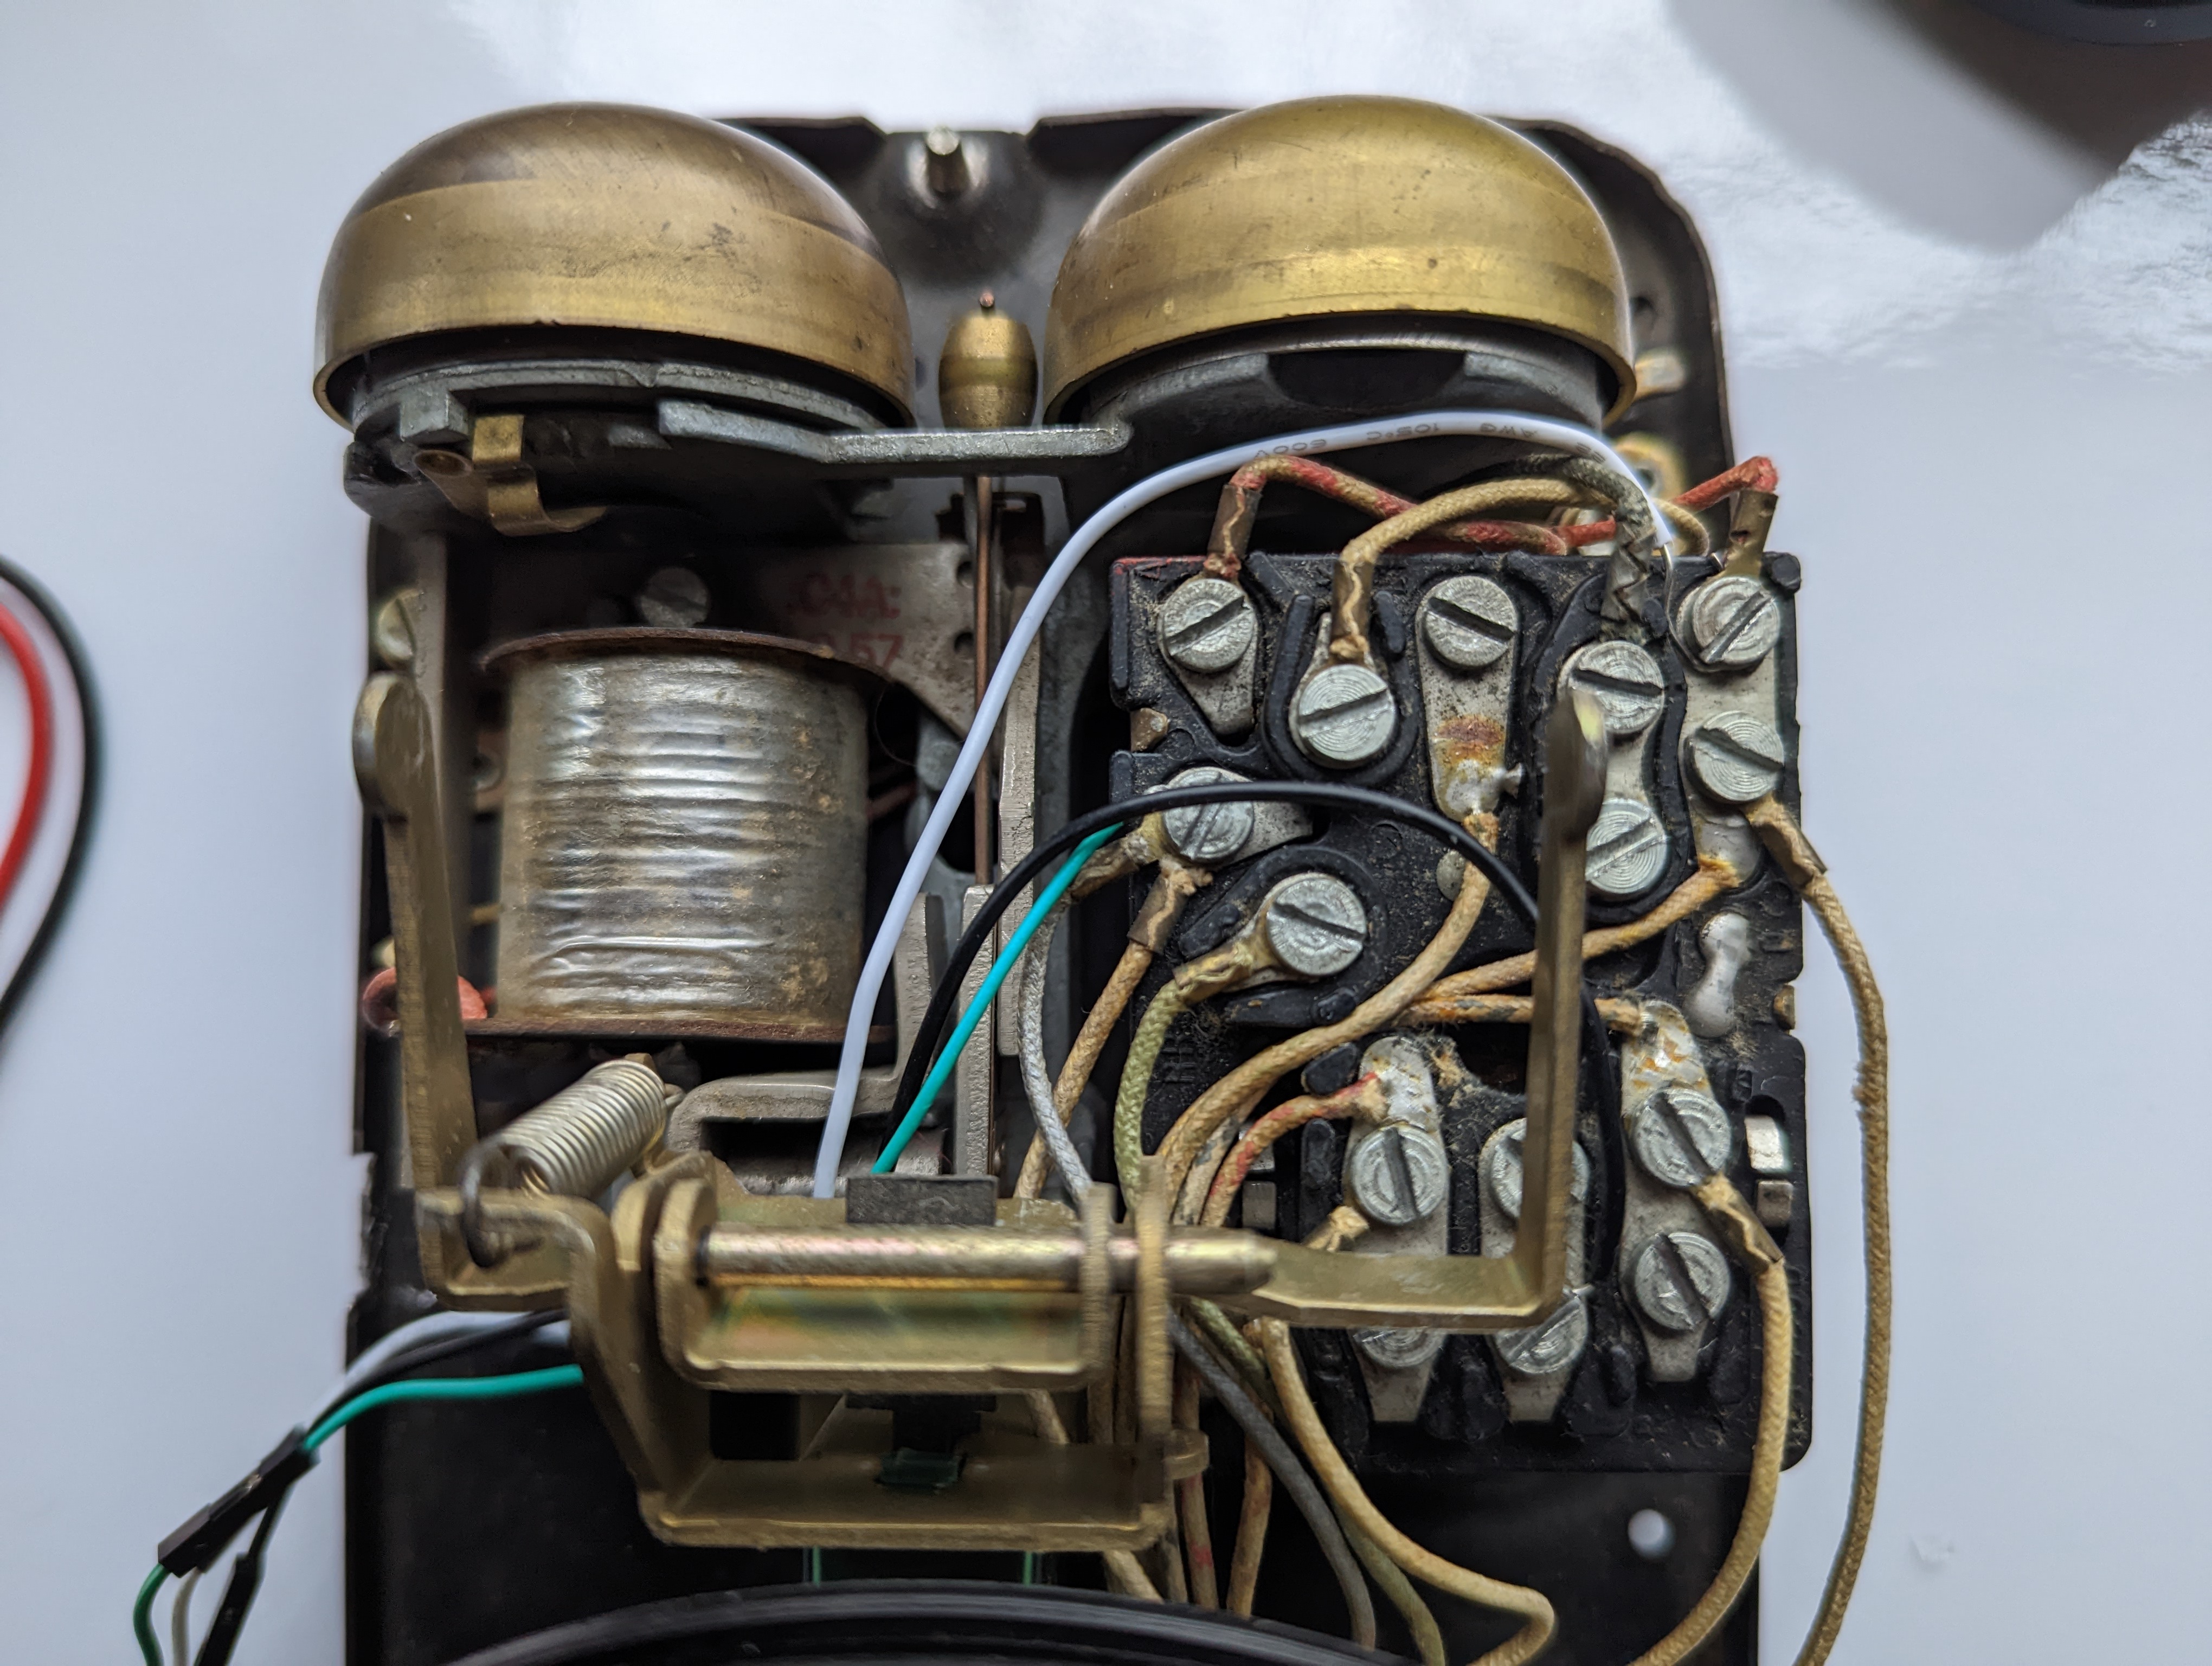
Hook
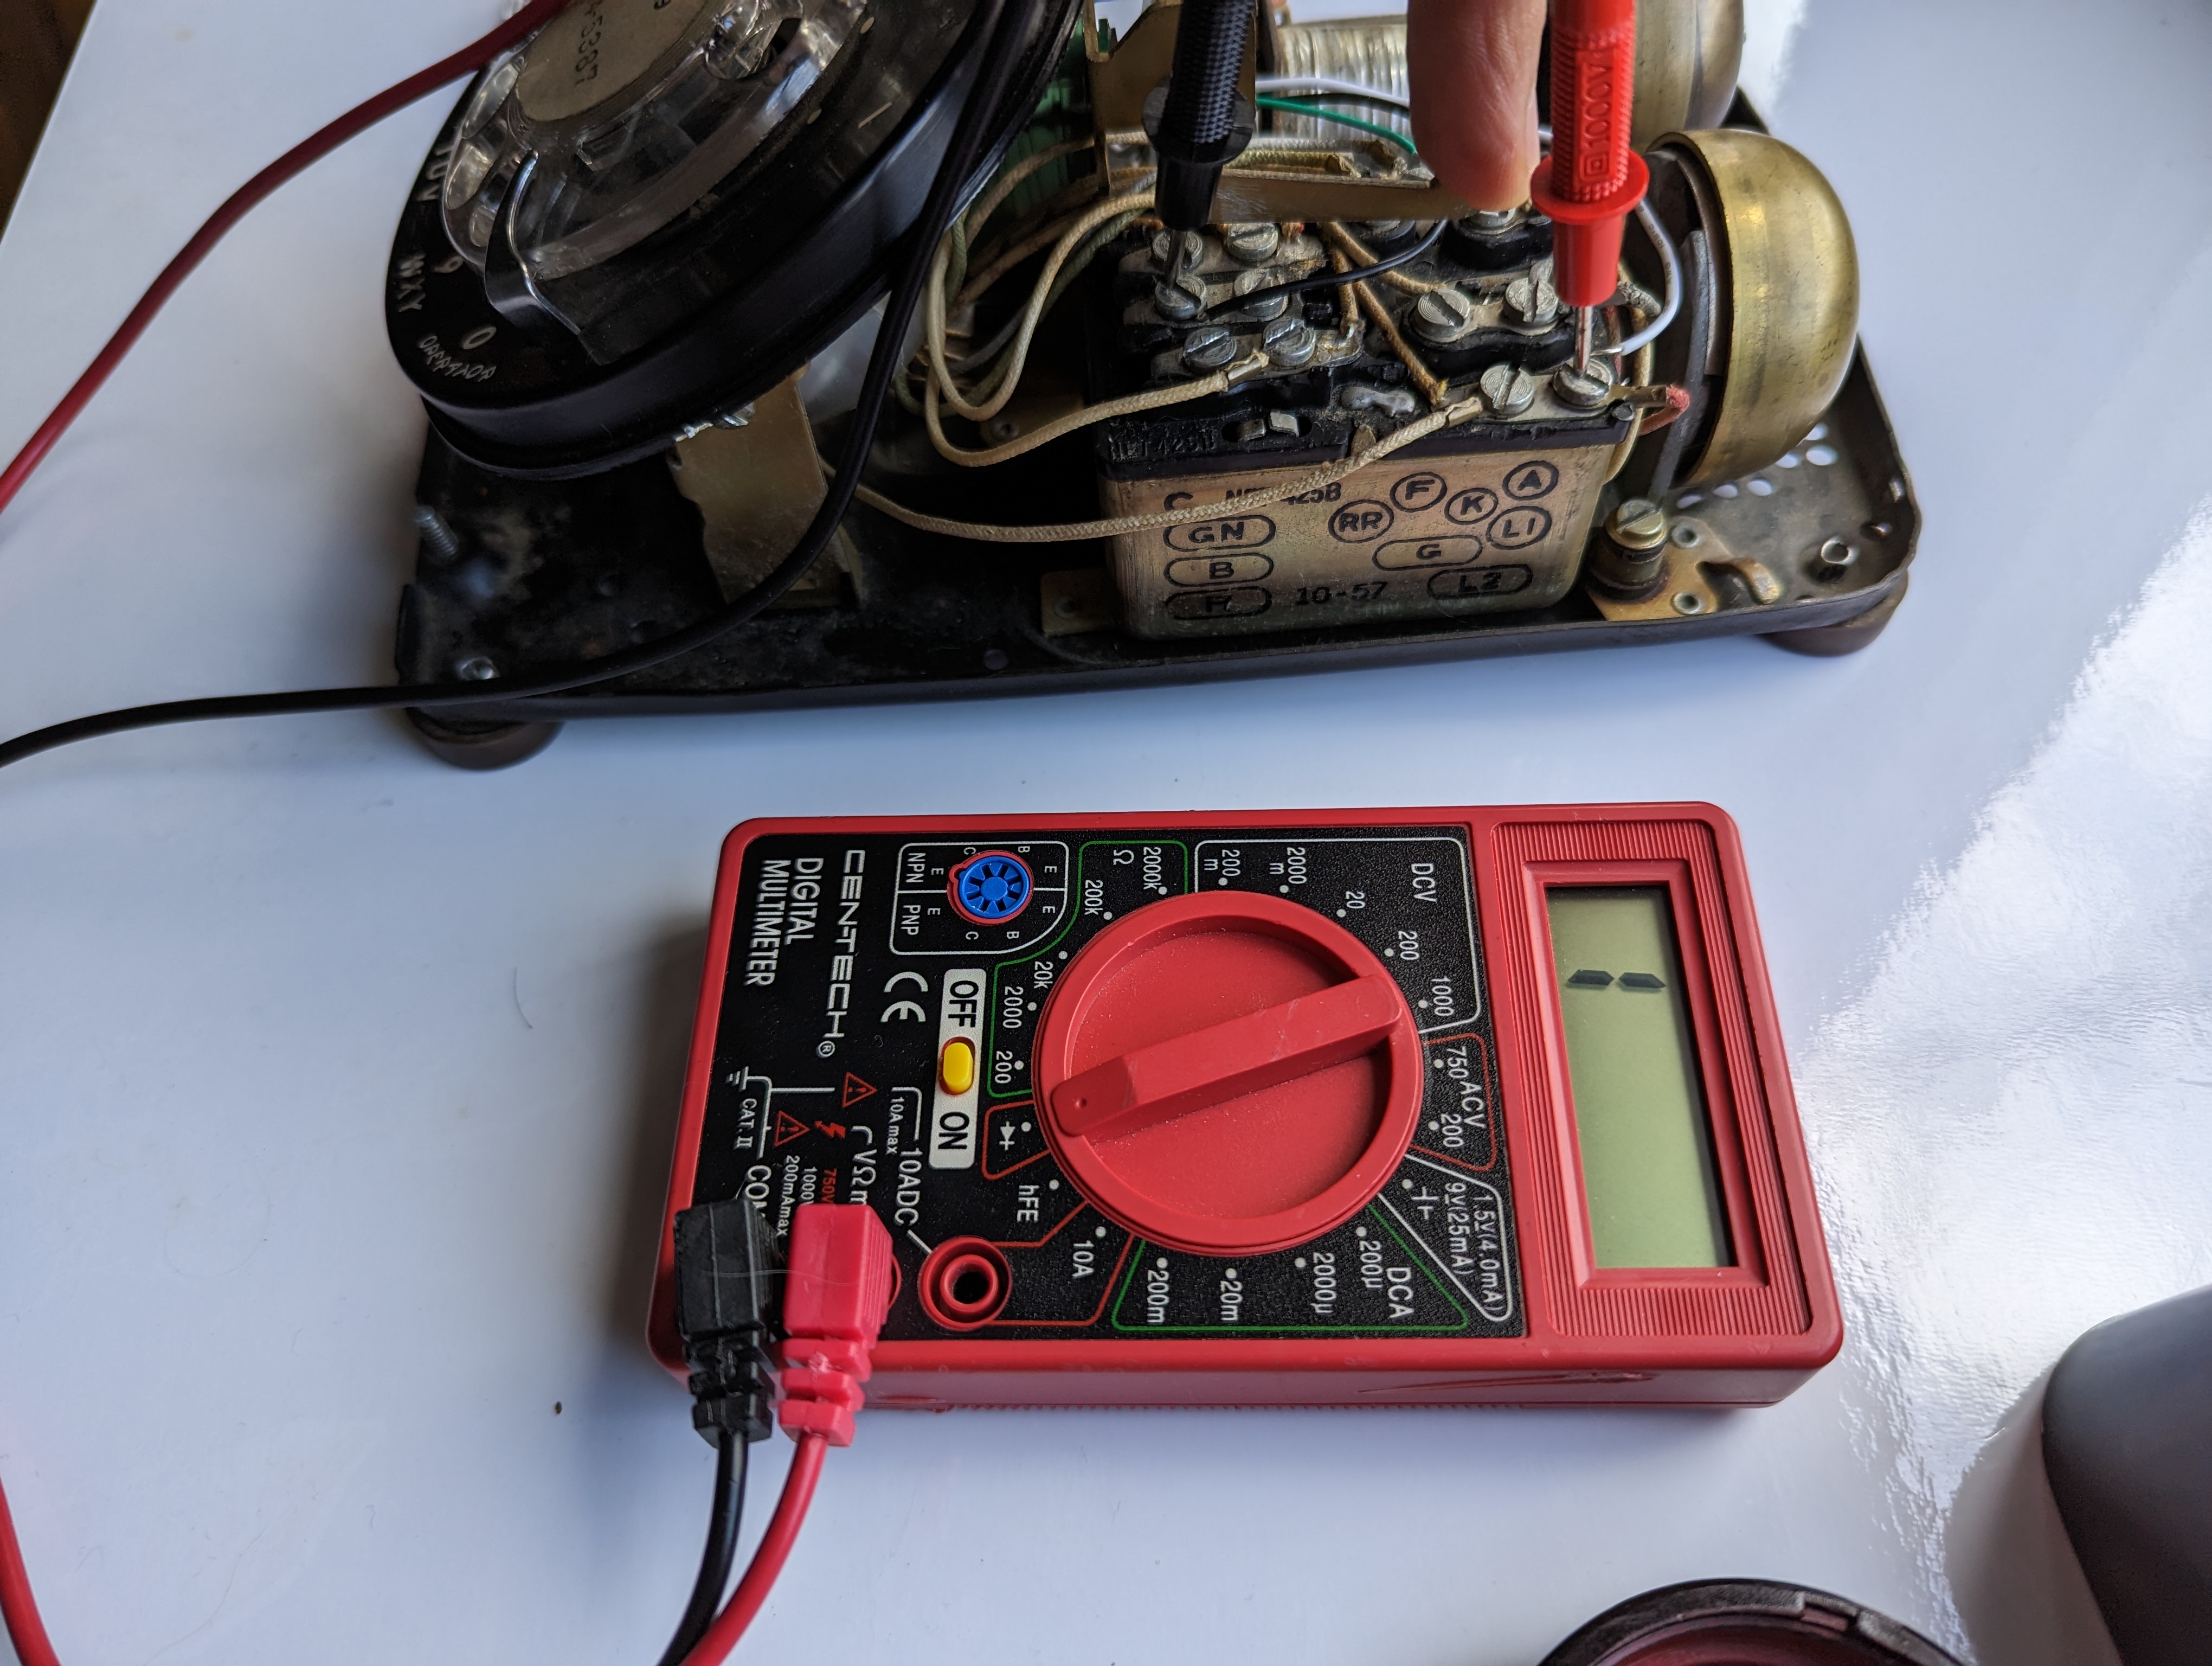
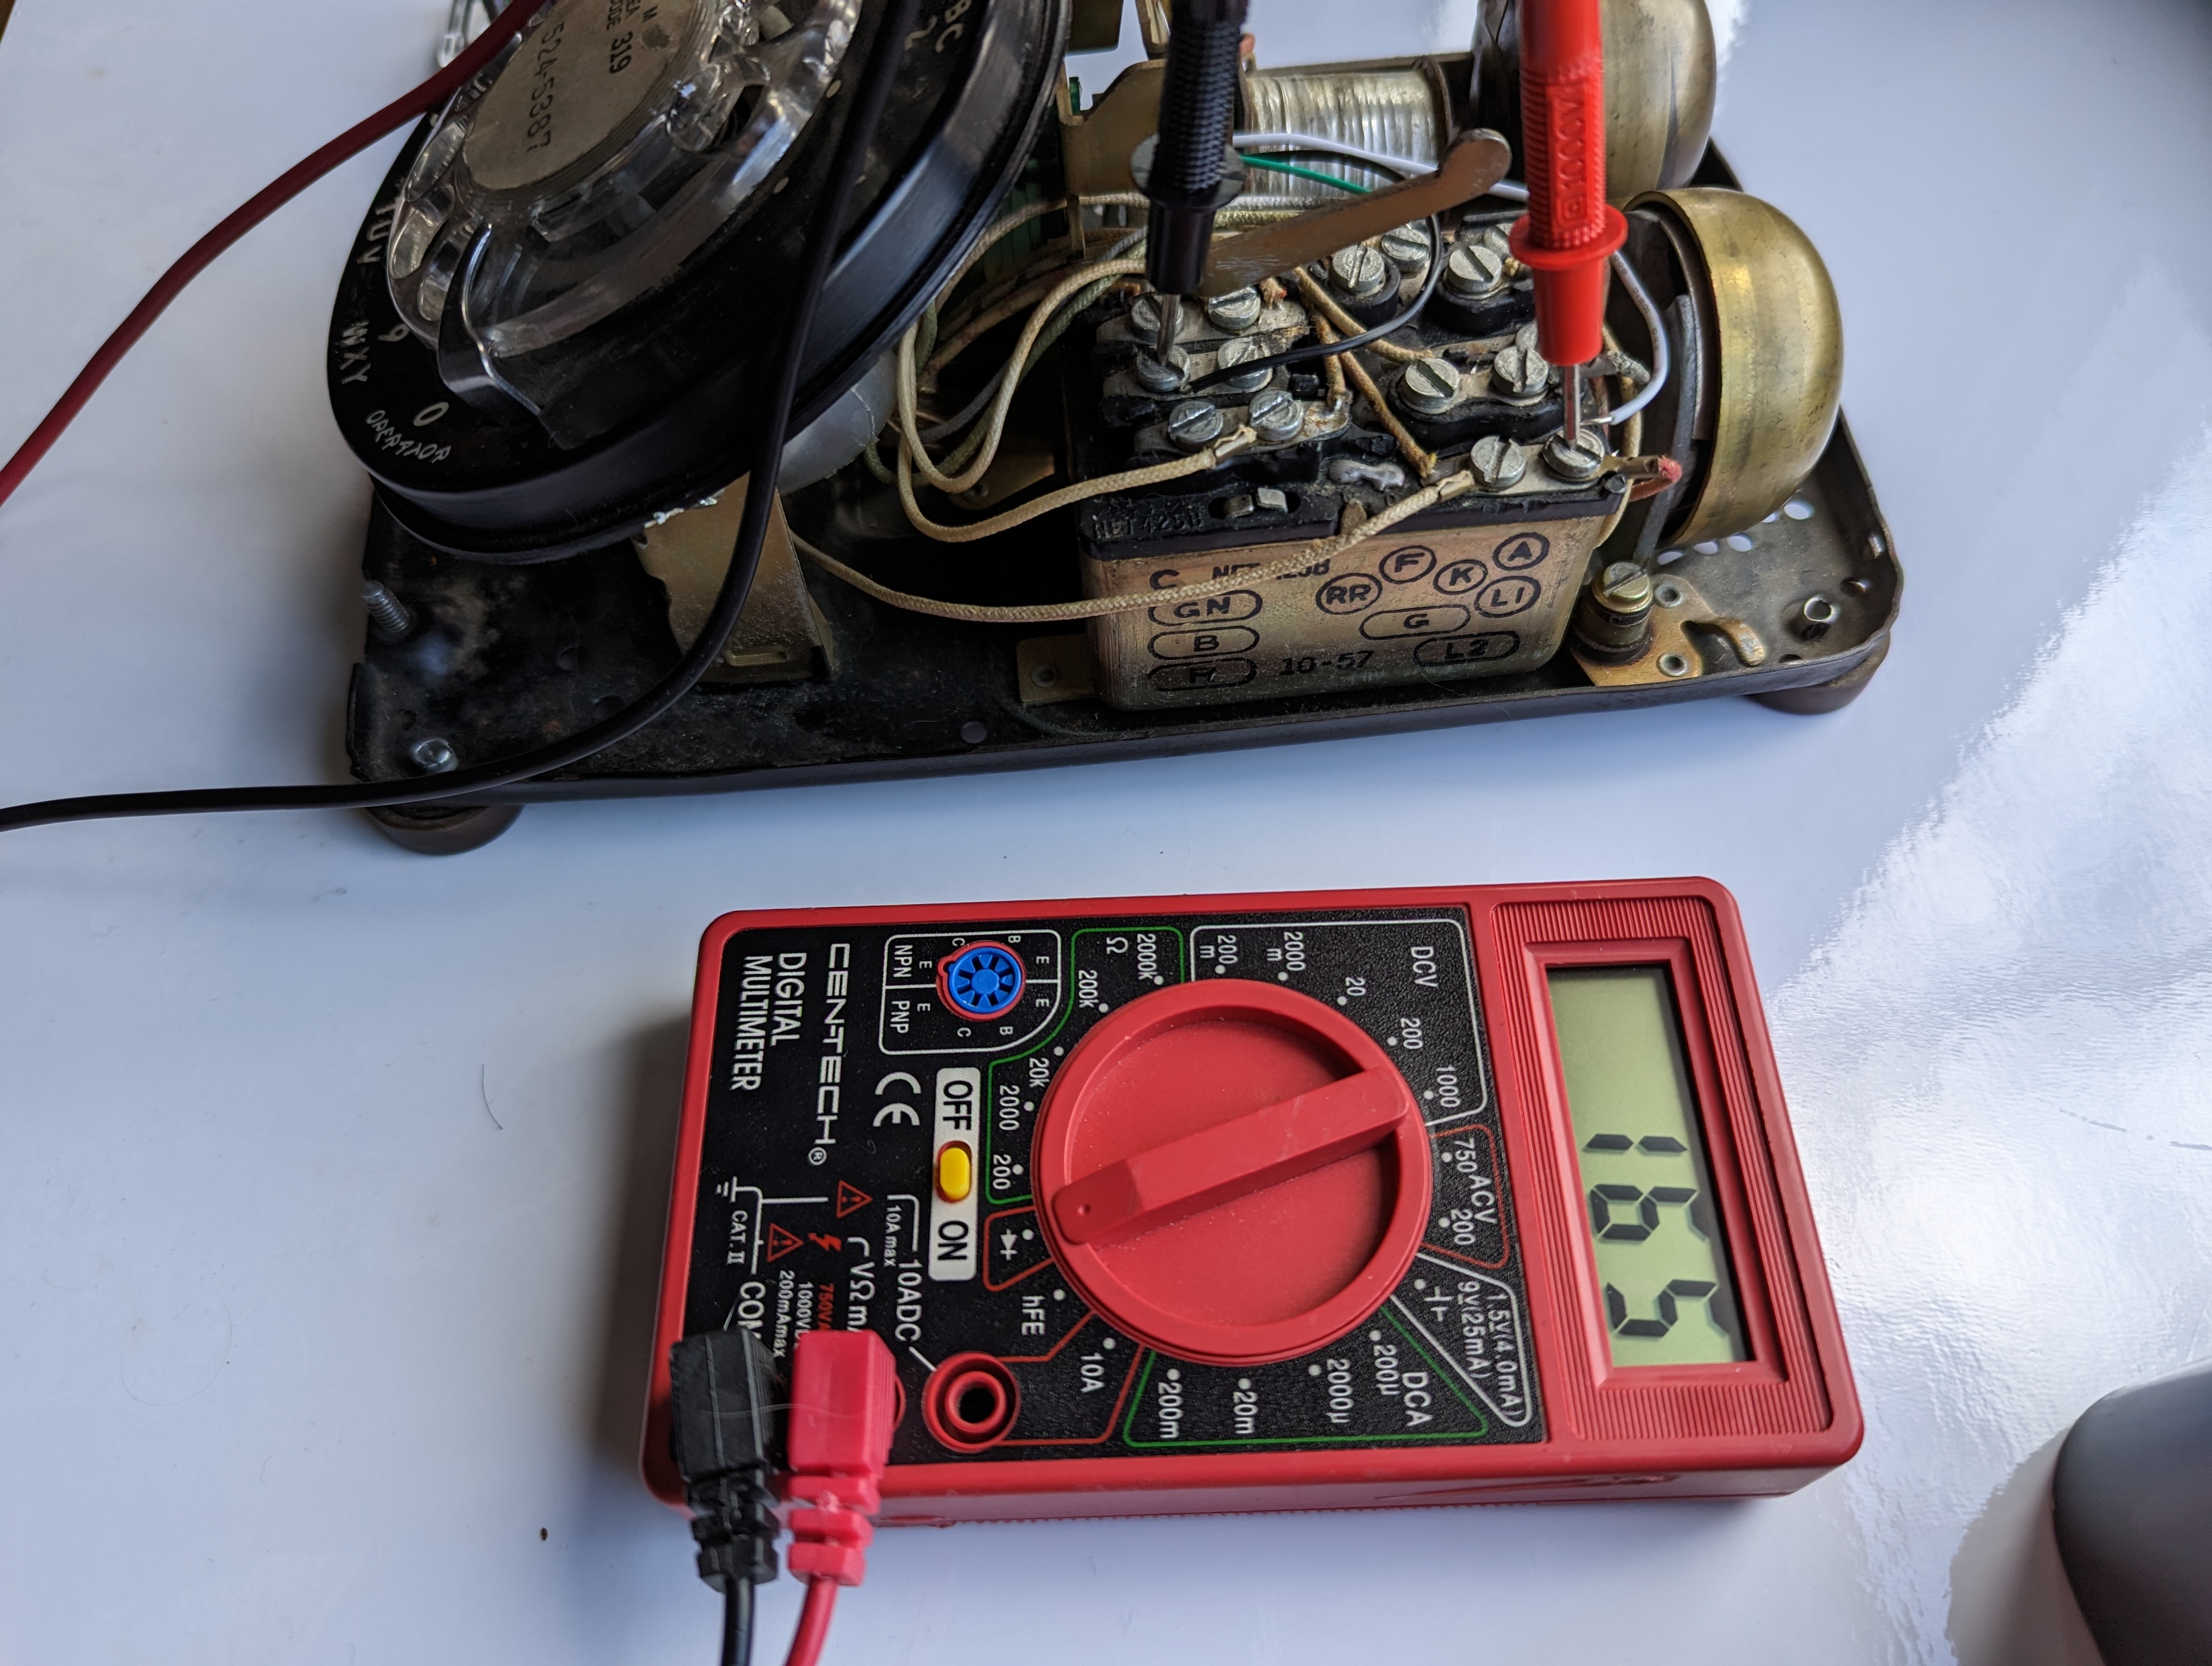
- Use multimeter to do a continuity check to find out which pins control the hook:
| On-hook --> Open circuit (Value == 1) | Off-hook --> Current flowing |
|---|---|
 |
 |
-
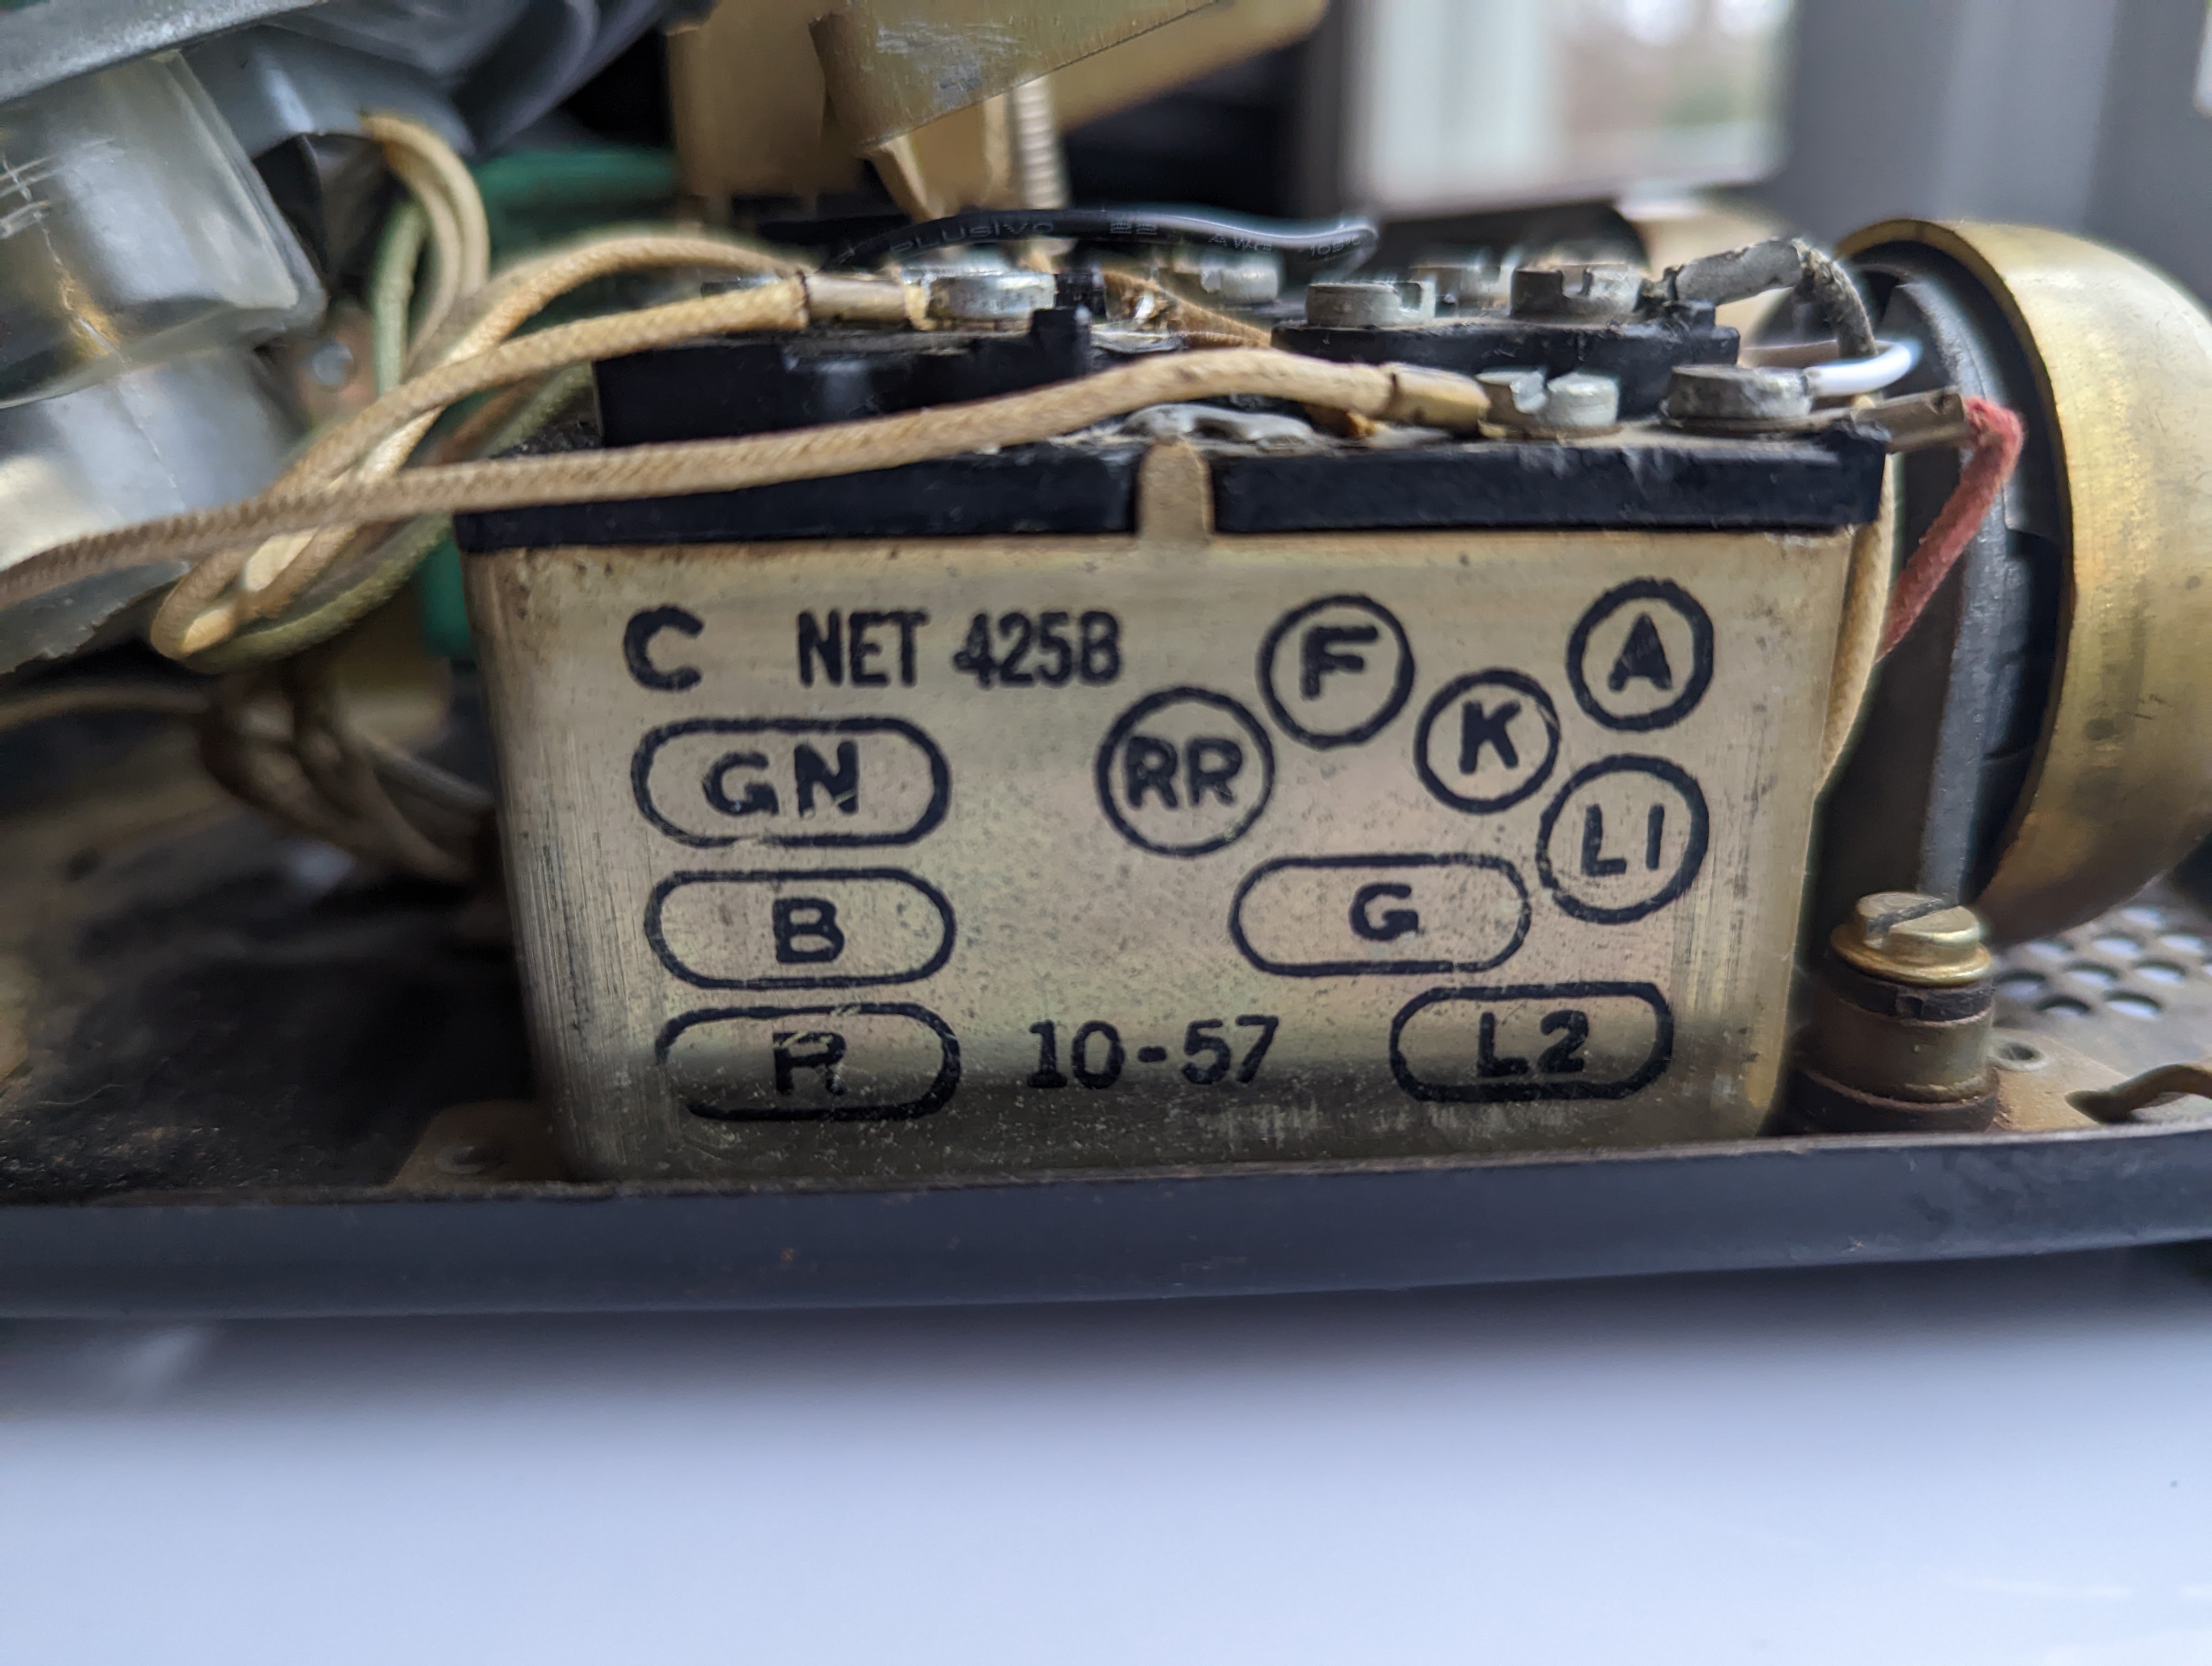
The B screw terminal on the rotary phone is connected to the black wire which is grounded to the rpi.
-
The L2 screw terminal on the rotary phone is connected to the white wire which is connected to GPIO pin 22 on the rpi.
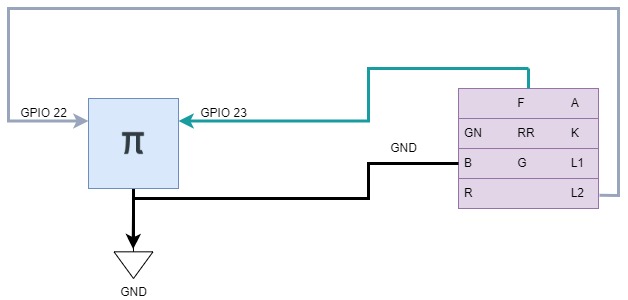
-
Note: the green wire was used for the experimental rotary encoder feature identified in the future work section.
| Rotary Phone Block Terminal | Top-down view |
|---|---|
 |
 |
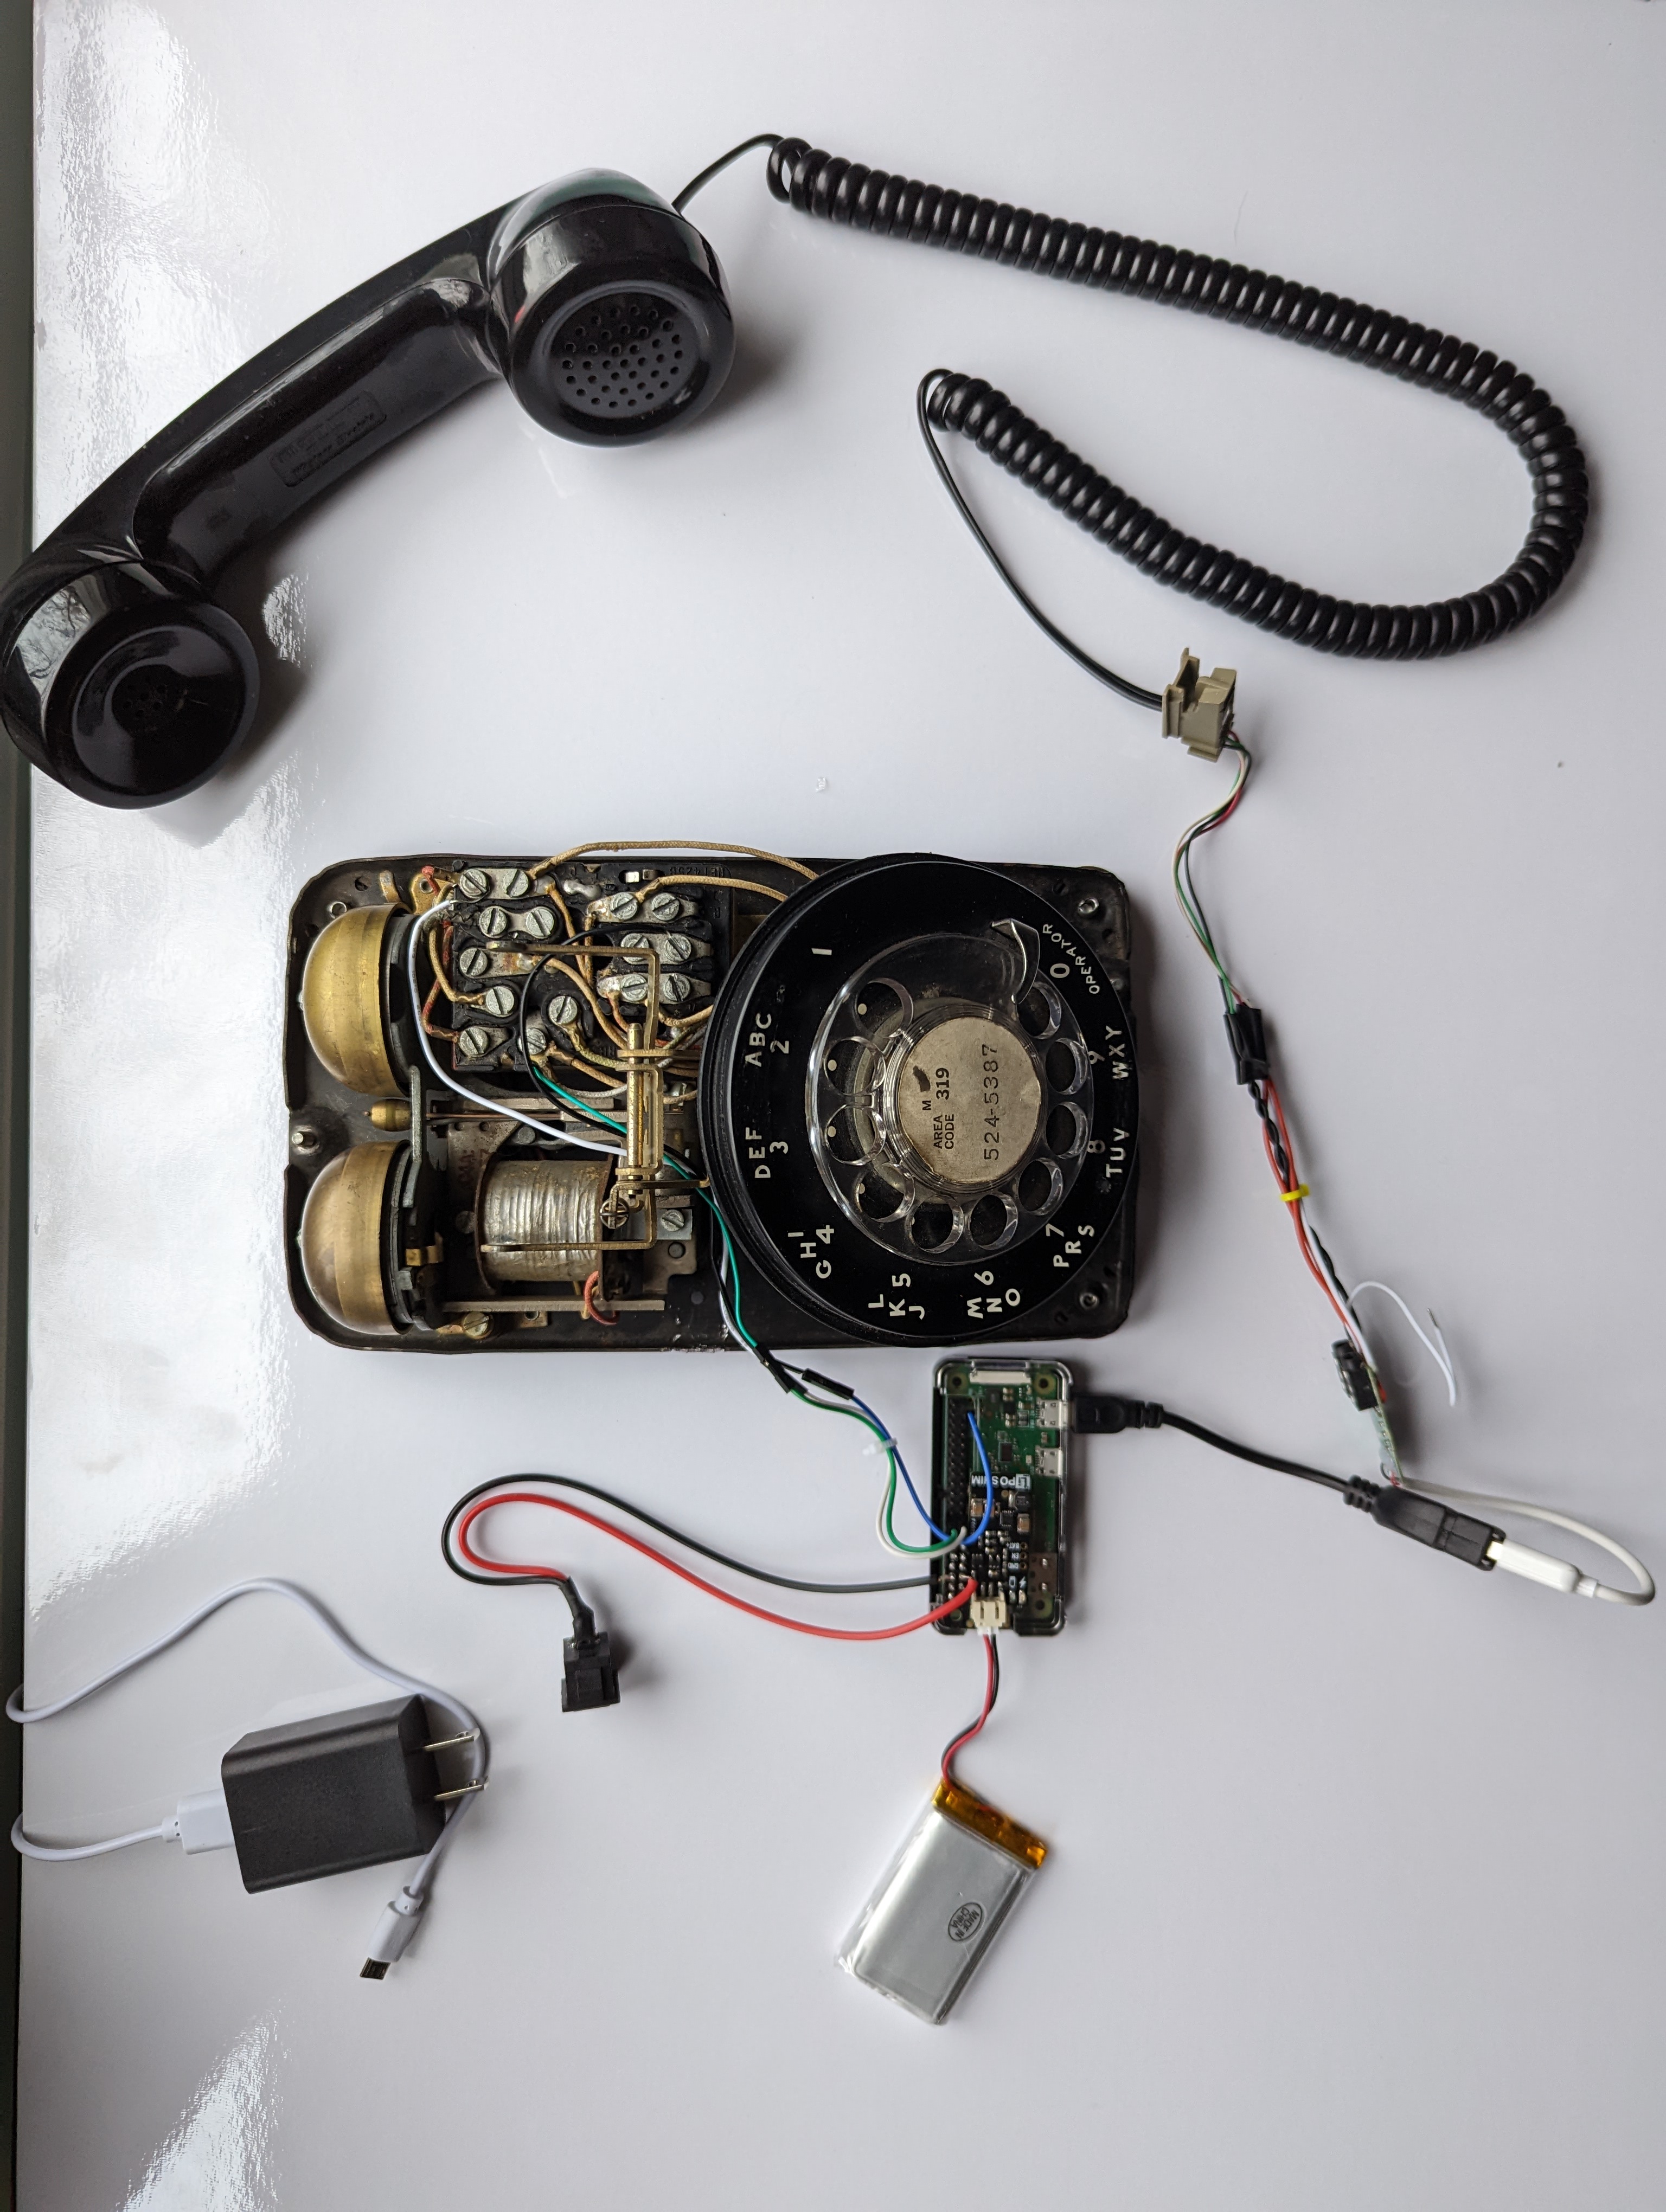
Phone Cord
- The wires from the handset cord need to be connected to the USB audio interface
- I soldered it but you can alternatively use 2x 3.5mm Male to Screw Terminal Connector which plug directly into the rpi.
- Note: The USB audio interface looks weird in the pics since I stripped the plastic shell off in order to solder directly to the mic/speaker leads
- I soldered it but you can alternatively use 2x 3.5mm Male to Screw Terminal Connector which plug directly into the rpi.
- Use this ALSA command from the command line to test if the mic is working on the rpi before you set up the rotary phone:
aplay -l- You might have a different hardware mapping than I did, in which case you would change the
alsa_hw_mappingin the config.yaml. - Here's a good reference to device selection.
- You can also check this from Python.
- You might have a different hardware mapping than I did, in which case you would change the
Microphone Replacement (Optional)
I found the sound quality of the built-in carbon microphone on the rotary phone to be quite lacking in terms of amplitude, dynamic range and overall vocal quality. I tried boosting the gain from the digital (ALSA driver) side but this introduced an incredible amount of noise as expected. I then approached this from the analog domain and tried alternative circuitry to boost the sound quality based off this carbon-to-dynamic converter.
Might be worth a further investigation in the future since it retains the integrity of the original rotary phone.
My final attempt involved the introduction of some post-proceesing (see dev branch) to bandpass some of the freqs outside the speech domain and add some normalization. The processing was costly in terms of processing and power consumption/rendering time and I ultimately decided it was worth acquiring something that yielded a better capture right out the gate. Crap in, crap out - as they say in the sound recording industry.
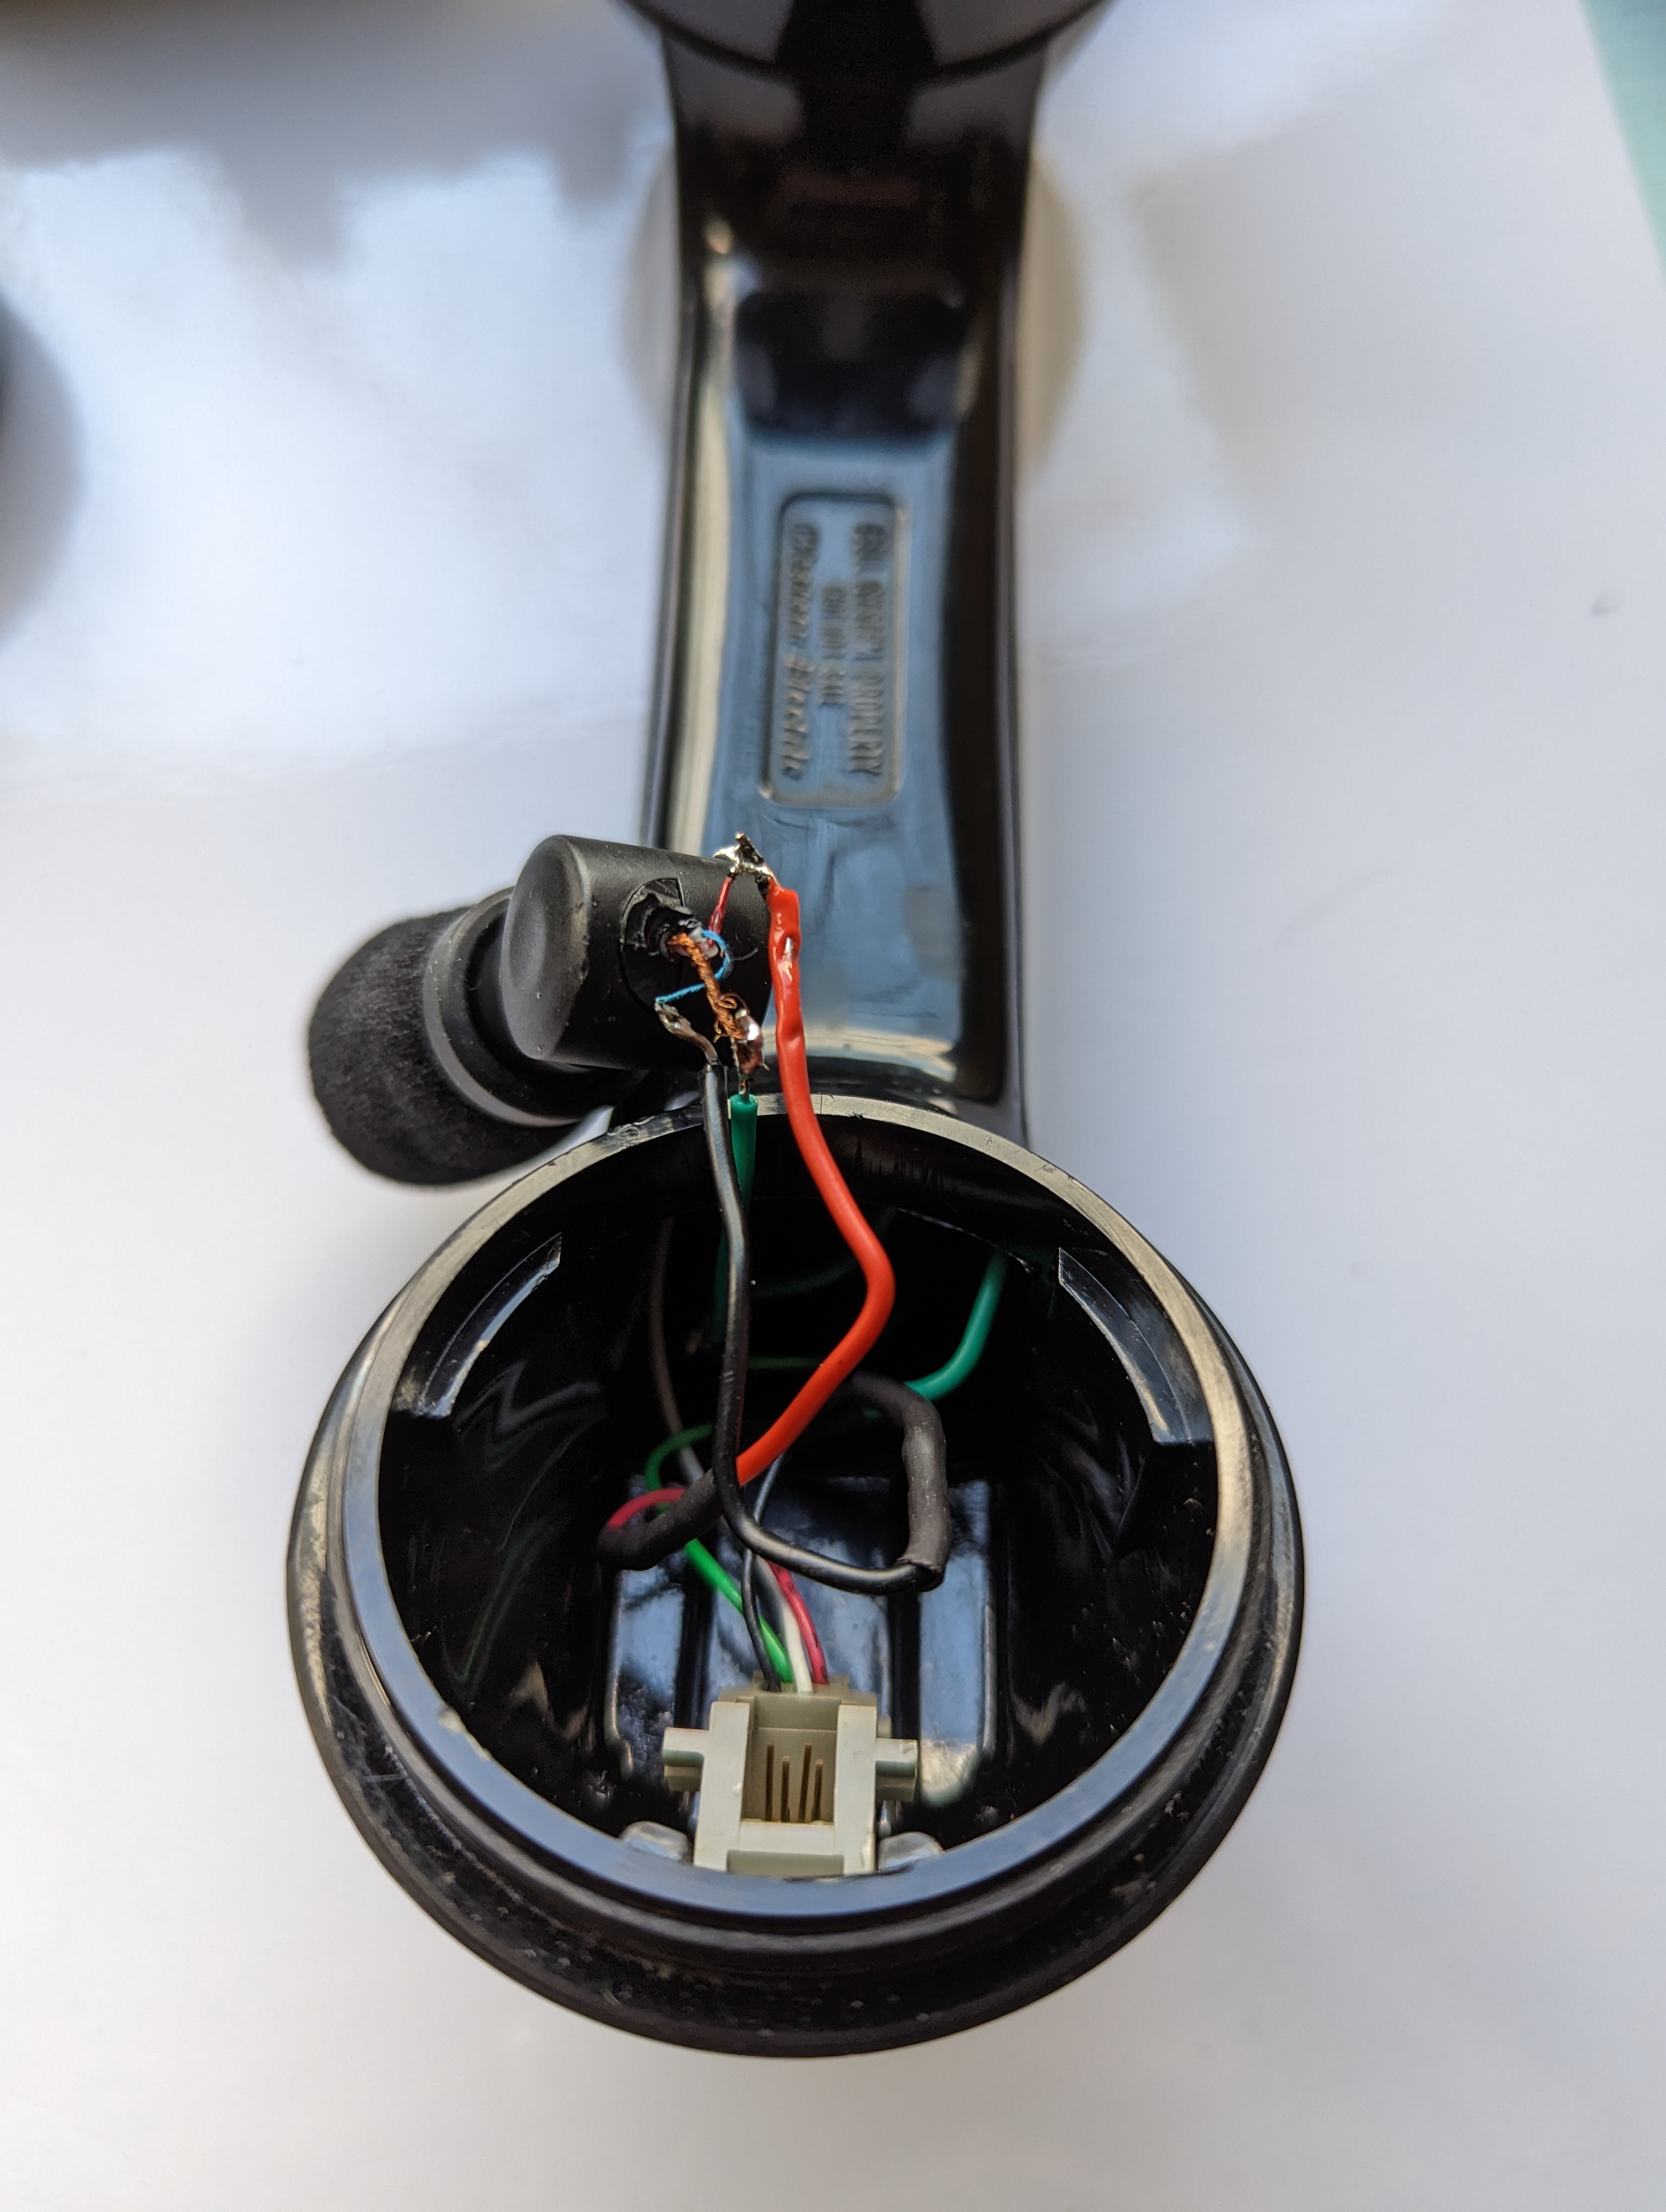
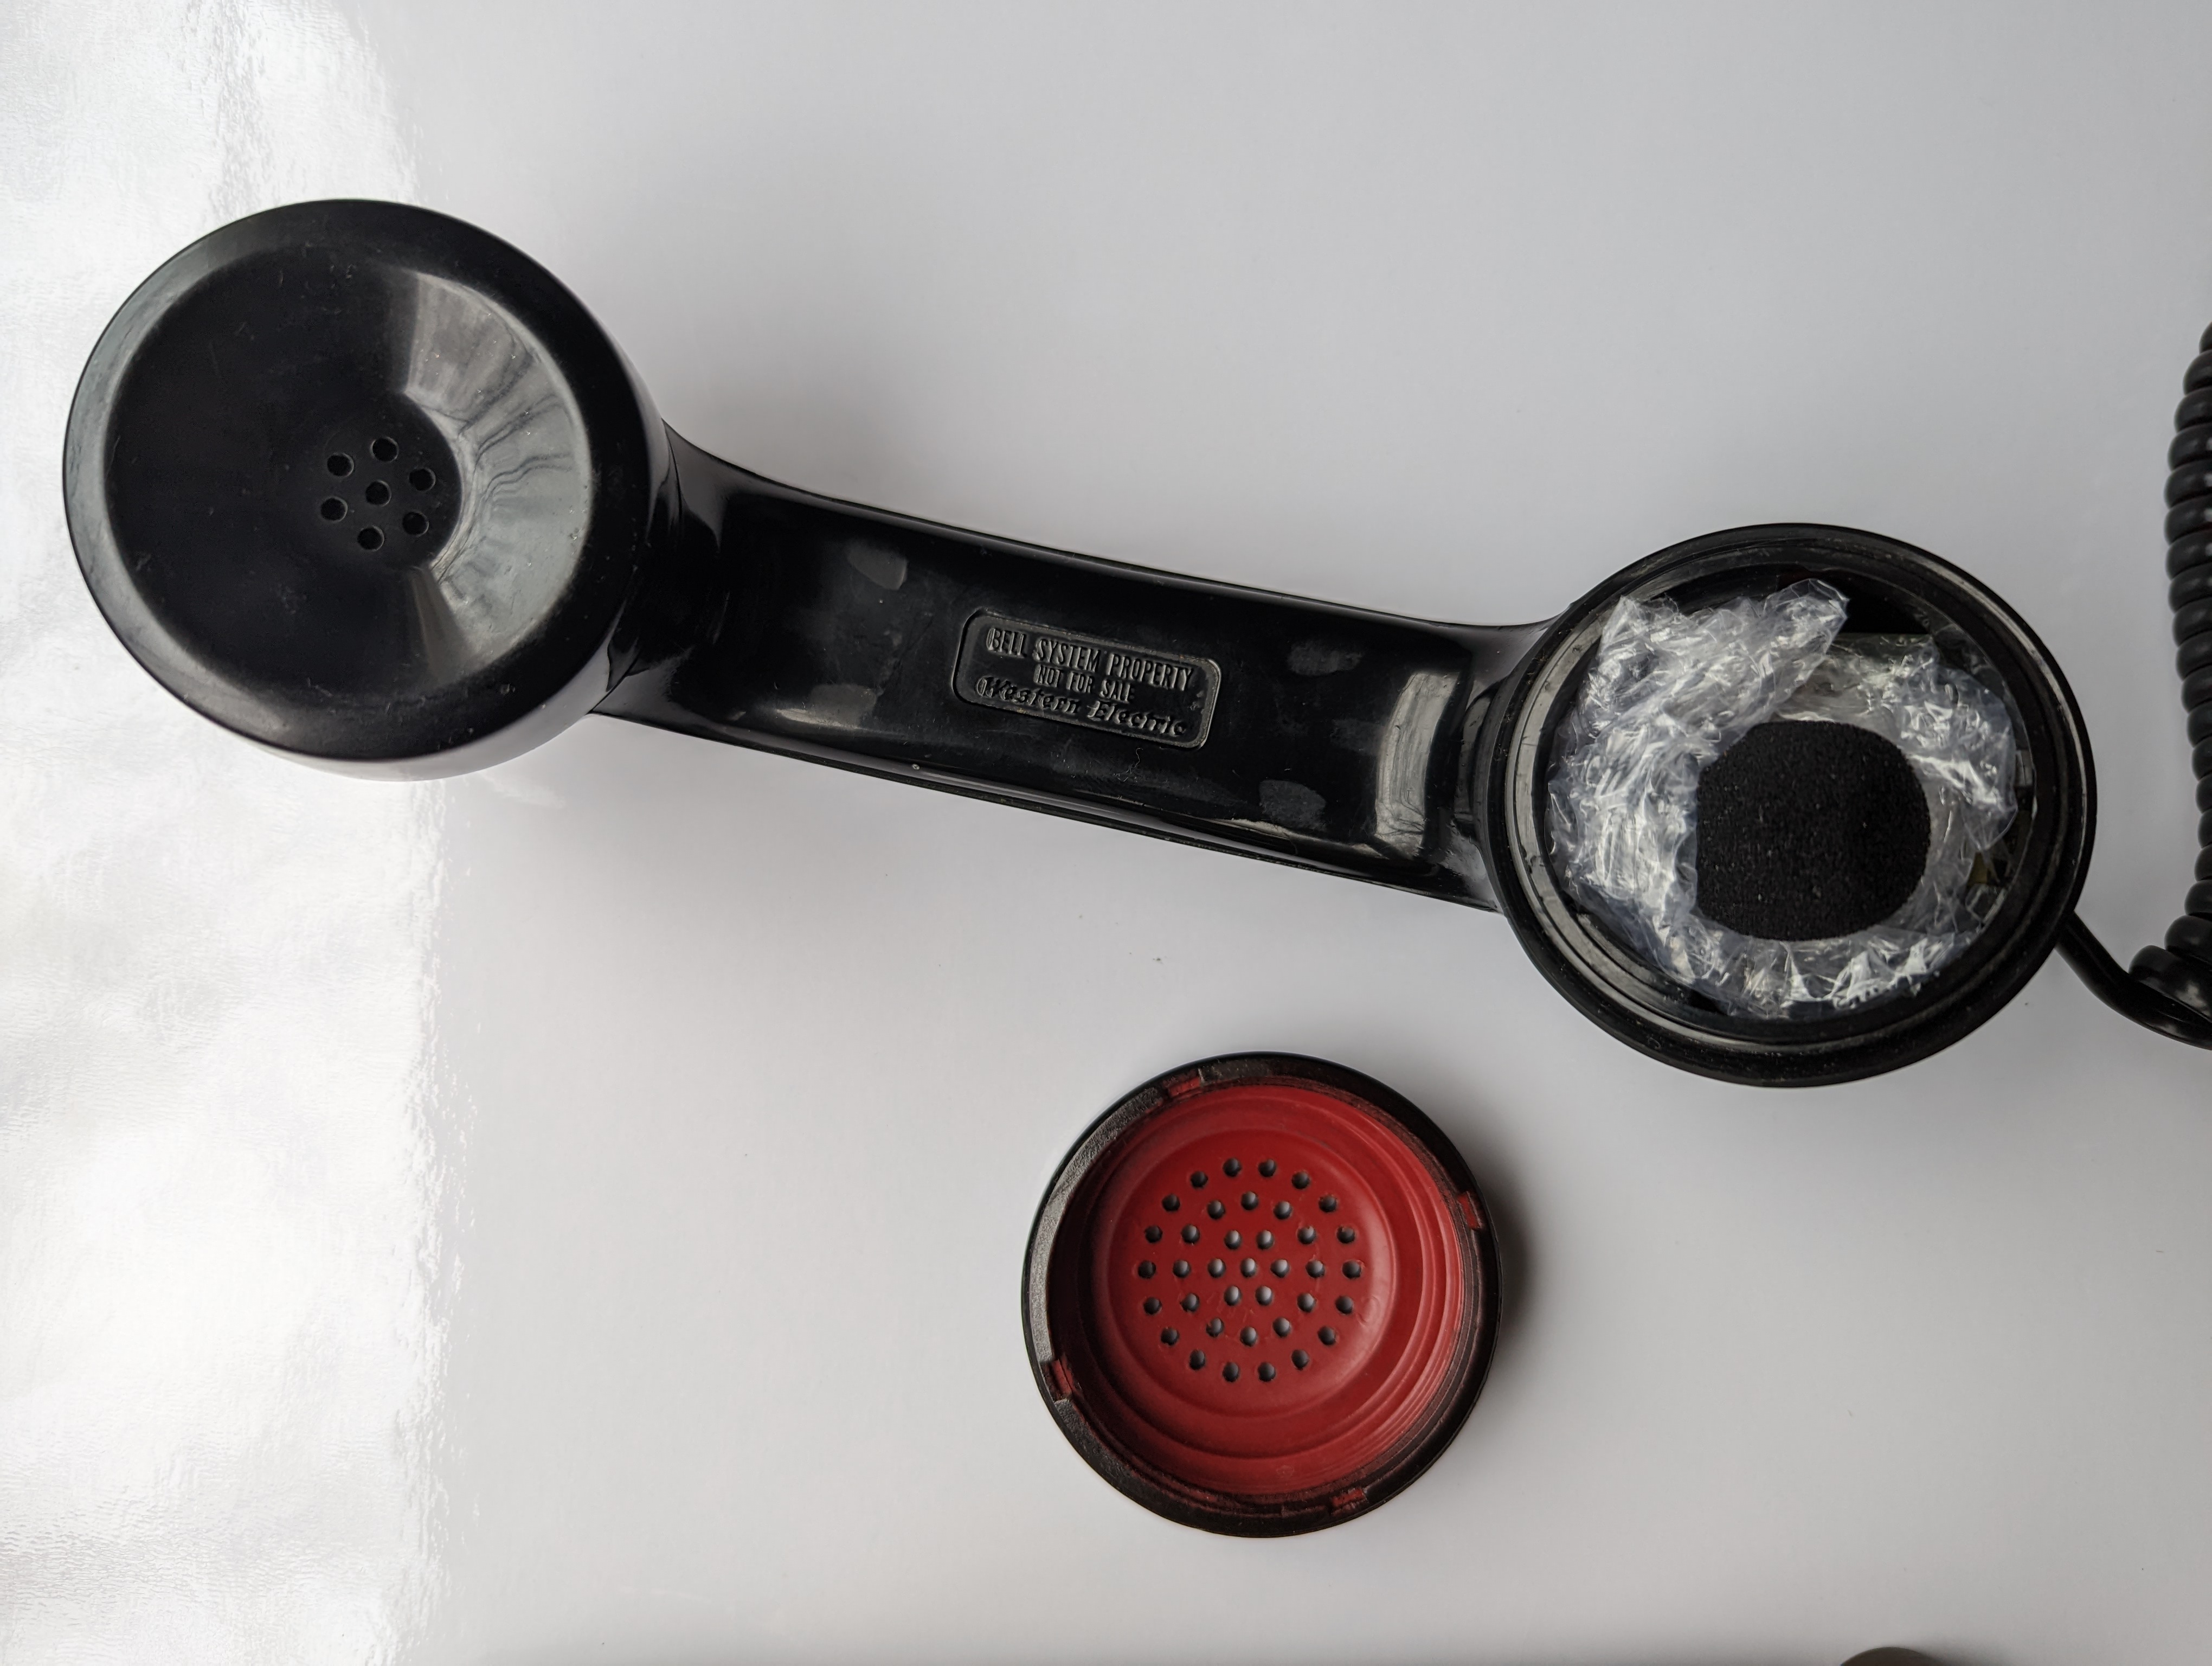
To replace:
- Unscrew mouthpiece and remove the carbon mic
- Pop out the plastic terminal housing with the two metal leads
- Unscrew red and black wires from terminal
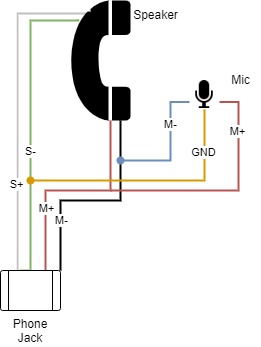
- Prepare your lav mic
- I pulled off the 3.5mm male headphone pin since it is usually coated and annoyingly difficult to solder directly on to.
- Carefully separate the two wires from the lav mic and spiral up the surrounding copper. This will act as our ground signal.
- Extend the green wire from the phone cord clip to the ground point of the lav mic.
- Red to red, black to blue as per the following diagram:
Software
Dev Environment
- rpi image: Rasbian w/ SSH enabled
- rpi on same network as development machine
- Desktop IDE: vscode w/ SSH FS extension
Here's a great guide to get the rpi setup headless w/ SSH & WiFi dialed in.
Dependencies
Config
- This file allows you to customize your own set up (edit rpi pins, audio reduction, alsa mapping, etc), modify the yaml as necessary.
- Ensure the sample rate is supported by your audio interface (default = 44100 Hz (decimal not required))
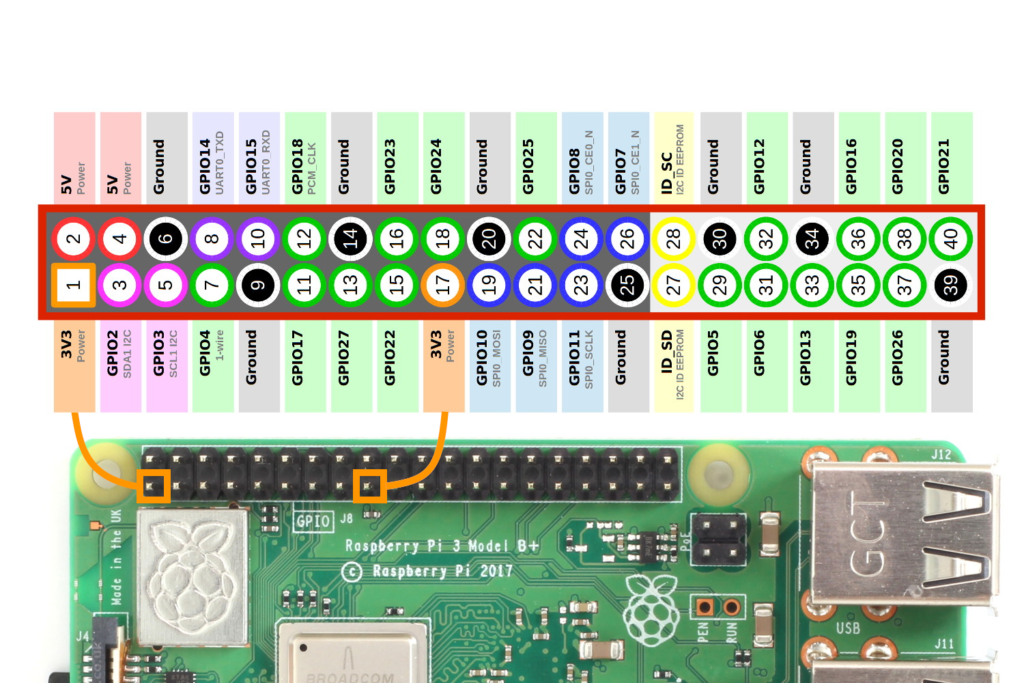
- For GPIO mapping, refer to the wiring diagram specific to your rpi:
AudioInterface Class
- Utilizes pydub and pyaudio extensively.
- Houses the main playback/record logic and has future #TODO expansion for postprocessing the audio. Would like to test on an rpi4 to see if it can handle it better for real-time applications.
audioGuestBook systemctl service
This service starts the python script on boot. Place it in the /etc/systemd/system directory.
systemctl enable audioGuestBook.service
systemctl start audioGuestBook.service
Operation Mode 1: audioGuestBook
- This is the main operation mode of the device.
- There are two callbacks in main which poll the gpio pins for the specified activity (hook depressed, hook released).
- Once triggered the appropriate function is called.
- On hook (depressed)
- Nothing happens
- Off hook (released)
- Plays back your own welcome message located in
/sounds/voicemail.wavfollowed by the beep indicating ready to record. - Begins recording the guests voice message.
- Guest hangs up, recording is stopped and stored to the
/recordings/directory.
- Plays back your own welcome message located in
Operation Mode 2: audioGuestBookwithRotaryDialer
Note: Untested - decided not to go this route for my own wedding
- This mode is a special modification of the normal operation and requires a slightly different wiring connection since it accepts input from the rotary dialer.
- The idea was to playback special messages when particular users dial a certain number combination (i.e. 909 would play back a message for certain guests who lived with the groom in that area code).
- In this mode of operation the users will need to dial 0 on the rotary dialer in order to initiate the voicemail.
- The rotary dialer is a bit more complex to set up, you need a pull up resistor connected between the F screw terminal and 5V on the rpi and the other end on GPIO 23. #TODO: Diagram
Troubleshooting
Verify default audio interface
A few users had issues where audio I/O was defaulting to HDMI. To alleviate this, check the following:
Check the Sound Card Configuration:
Verify the available sound devices using the following command:
aplay -l
Ensure that your USB audio interface is listed and note the card and device numbers.
Set the Default Sound Card:
If you want to route audio through your USB audio interface, you'll need to make it the default sound card.
Edit the ALSA configuration file (usually located at /etc/asound.conf or ~/.asoundrc) and add the following:
defaults.pcm.card X
defaults.ctl.card X
Replace X with the card number of your USB audio interface obtained from the previous step.
Restart ALSA
sudo /etc/init.d/alsa-utils restart