Rotary Phone Audio Guestbook
This project transforms a rotary phone into a voice recorder for use at special events (i.e. wedding audio guestbook, etc.).

- Rotary Phone Audio Guestbook
Background
Inspired by my own upcoming wedding, I created a DIY solution for an audio guestbook using a rotary phone. With most online rentals charging exorbitant fees without offering custom voicemail options, I sought a more affordable and customizable solution. Here, I've detailed a guide on creating your own audio guestbook. If you have questions, don't hesitate to reach out.
Post-Event Reflection
The real event provided insights into areas of improvement for the setup. For instance, introducing a recording time limit became essential after some younger attendees left lengthy messages, draining the battery. Depending on the situation, you might also consider connecting the setup directly to a 5V power supply.
Future Enhancements
In anticipation of my wedding, I had code in place to detect dialed numbers from the rotary encoder, allowing us to play special messages for specific guests based on their dialed combination. However, this required users to dial zero before leaving a voice message, introducing an extra step. We opted for simplicity, but if you're interested in expanding on this, you're welcome to explore further. The details of this operation mode are described in Mode 2
Additionally, threading the audio playback would be beneficial, allowing for a watchdog service to terminate the thread upon a hook callback. This would stop the message playback when a user hangs up.
Quick-Start
After cloning the repo on the rpi:
chmod +x installer.sh
./installer.sh
Materials
Parts List
| Part | Notes | Quantity | Cost |
|---|---|---|---|
| rotary phone | Estate/garage/yard sales are probably the best places to find once of these. Ideally one with a phone jack since we will be using these four wires extensively. | 1 | $0.00-$60.00 |
| raspberry pi zero | I didn't realize how hard these are to find these days. You can use any rpi or arduino style single-board computer but be aware of size constraints (i.e. must fit inside the rotary phone enclosure) | 1 | $9.99 |
| raspberry pi zero case | Optional: added for protection. One of the cases on Amazon has a heat-sink cutout which might be nice for better heat dissapation since it will all be enclosed in the end. | 1 | $4.95 |
| micro SD card | Any high capacity/throughput micro SD card that is rpi compatible | 1 | $8.99 |
| USB Audio Adapter | Note: I removed the external plastic shell and directly soldered the wires instead of using the female 3.5mm receptacle. | 1 | $4.95 |
| USB OTG Host Cable - MicroB OTG male to A female | 1 | $2.50 | |
| --- | --- If you don't want to solder anything --- | --- | --- |
| 3.5mm Male to Screw Terminal Connector | Optional: can connect the handset cables directly to the USB audio interface via these screw terminals | 2 | $1.37 |
| --- | --- If running off a battery --- | --- | --- |
| LiPo Battery | Optional: maximize capacity based on what will fit within your rotary enclosure. | 1 | $12.50 |
| LiPo Shim | Optional: if you plan to run this off a LiPo I would recommend something like this to interface with the rpi zero. | 1 | $9.95 |
| LiPo Charger | Optional: for re-charging the LiPo. | 1 | $6.95 |
| --- | --- If replacing the built-it microphone --- | --- | --- |
| LavMic | Optional: if you'd like to replace the carbon microphone. This is an omnidirectional lavalier mic and outputs via a 3.5mm TRS | 1 | $24.95 |
Hardware
Wiring
Hook
Understanding Hook Types: Depending on your rotary phone model, the hook switch may be Normally Closed (NC) or Normally Open (NO). When the phone is on the hook:
- NC: The circuit is closed (current flows).
- NO: The circuit is open (no current).
To accommodate either type, you'll need to update the config.yaml with the appropriate hook type setting.
- Use multimeter to do a continuity check to find out which pins control the hook:
| On-hook --> Open circuit (Value == 1) | Off-hook --> Current flowing |
|---|---|
 |
 |
-
The B screw terminal on the rotary phone is connected to the black wire which is grounded to the rpi.
-
The L2 screw terminal on the rotary phone is connected to the white wire which is connected to GPIO pin 22 on the rpi.
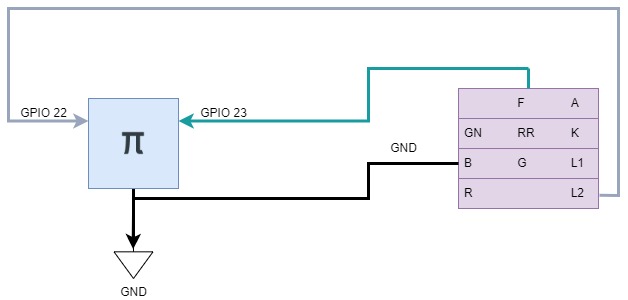
-
Note: the green wire was used for the experimental rotary encoder feature identified in the future work section.

| Rotary Phone Block Terminal | Top-down view |
|---|---|
 |
 |
Phone Cord
- The wires from the handset cord need to be connected to the USB audio interface
- I soldered it but you can alternatively use 2x 3.5mm Male to Screw Terminal Connector which plug directly into the rpi.
- Note: The USB audio interface looks weird in the pics since I stripped the plastic shell off in order to solder directly to the mic/speaker leads
- I soldered it but you can alternatively use 2x 3.5mm Male to Screw Terminal Connector which plug directly into the rpi.

- Use this ALSA command from the command line to test if the mic is working on the rpi before you set up the rotary phone:
aplay -l- You might have a different hardware mapping than I did, in which case you would change the
alsa_hw_mappingin the config.yaml. - Here's a good reference to device selection.
- You can also check this from Python.
- You might have a different hardware mapping than I did, in which case you would change the
Optional: Microphone Replacement
For improved sound quality, consider replacing the built-in carbon microphone.
I found the sound quality of the built-in mic on the rotary phone to be quite lacking in terms of amplitude, dynamic range and overall vocal quality. I tried boosting the gain from the digital (ALSA driver) side but this introduced an incredible amount of noise as expected. I then approached this from the analog domain and tried alternative circuitry to boost the sound quality based off this carbon-to-dynamic converter.
Might be worth a further investigation in the future since it retains the integrity of the original rotary phone.
My final attempt involved the introduction of some post-proceesing (see dev branch) to bandpass some of the freqs outside the speech domain and add some normalization. The processing was costly in terms of processing and power consumption/rendering time and I ultimately decided it was worth acquiring something that yielded a better capture right out the gate. Crap in, crap out - as they say in the sound recording industry.
To replace:
- Unscrew mouthpiece and remove the carbon mic
- Pop out the plastic terminal housing with the two metal leads
- Unscrew red and black wires from terminal
- Prepare your lav mic
- I pulled off the 3.5mm male headphone pin since it is usually coated and annoyingly difficult to solder directly on to.
- Carefully separate the two wires from the lav mic and spiral up the surrounding copper. This will act as our ground signal.
- Extend the green wire from the phone cord clip to the ground point of the lav mic.
- Red to red, black to blue as per the following diagram:


Software
Dev Environment
- rpi image: Rasbian w/ SSH enabled
- rpi on same network as development machine
- Optional: vscode w/ SSH FS extension
Here's a great guide to get the rpi setup headless w/ SSH & WiFi dialed in.
Installation
- On the networked rpi - clone the repository:
git clone https://git.izebra.net/izebra_projects/rotary-phone-audio-guestbook.git
cd rotary-phone-audio-guestbook
- Next, use the installer script for a hassle-free setup.:
chmod +x installer.sh
./installer.sh
-
Note, this script takes care of several tasks:
- Install required dependencies.
- Populate config.yaml based on user input
- Replace placeholders in the service file to adapt to your project directory.
- Move the modified service file to the systemd directory.
- Create necessary directories (recordings and sounds).
- Grant execution permissions to the Python scripts.
- Reload systemd, enable, and start the service.
audioGuestBook systemctl service
This service ensures smooth operation without manual intervention every time your Raspberry Pi boots up. The installer script will place this service file in the /etc/systemd/system directory and modify paths according to your project directory.
Manual control of the service is possible as it operates as any other .service entity
Config
- This file allows you to customize your own set up (edit rpi pins, audio reduction, alsa mapping, etc), modify the yaml as necessary.
- Ensure the sample rate is supported by your audio interface (default = 44100 Hz (decimal not required))
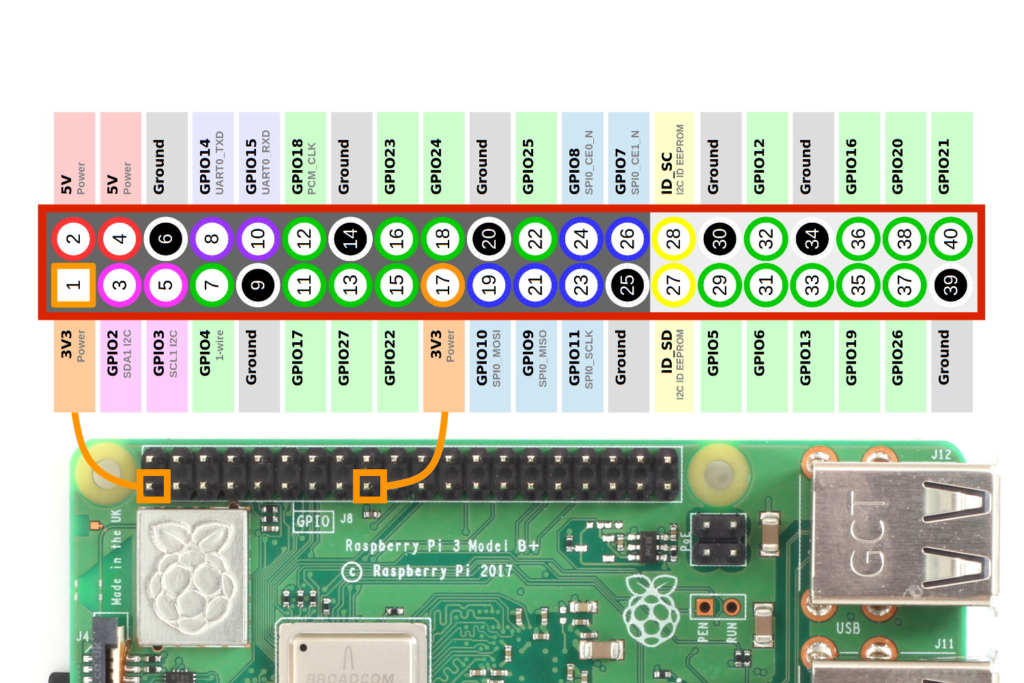
- For GPIO mapping, refer to the wiring diagram specific to your rpi:
- hook_type: Define your hook switch type here. Set it to "NC" if your phone uses a Normally Closed hook switch or "NO" for Normally Open.

AudioInterface Class
- Utilizes pydub and pyaudio extensively.
- Houses the main playback/record logic and has future #TODO expansion for postprocessing the audio. Would like to test on an rpi4 to see if it can handle it better for real-time applications.
Operation Mode 1: audioGuestBook
- This is the main operation mode of the device.
- There are two callbacks in main which poll the gpio pins for the specified activity (hook depressed, hook released).
- In the code, depending on the
hook_typeset in theconfig.yaml, the software will adapt its behavior. For NC types, hanging up the phone will trigger theon_hookbehavior, and lifting the phone will trigger theoff_hookbehavior. The opposite will be true for NO types. - Once triggered the appropriate function is called.
- On hook (depressed)
- Nothing happens
- Off hook (released)
- Plays back your own added welcome message located in
/sounds/voicemail.wavfollowed by the beep indicating the start of recording. - Begins recording the guests voice message.
- Guest hangs up, recording is stopped and stored to the
/recordings/directory. - If the guest exceeds the recording_limit specified in the config.yaml, play the warning time_exceeded.wav sound and stop recording.
- Plays back your own added welcome message located in
Operation Mode 2: audioGuestBookwithRotaryDialer
Note: Untested - decided not to go this route for my own wedding
- This mode is a special modification of the normal operation and requires a slightly different wiring connection since it accepts input from the rotary dialer.
- The idea was to playback special messages when particular users dial a certain number combination (i.e. 909 would play back a message for certain guests who lived with the groom in that area code).
- In this mode of operation the users will need to dial 0 on the rotary dialer in order to initiate the voicemail.
- The rotary dialer is a bit more complex to set up, you need a pull up resistor connected between the F screw terminal and 5V on the rpi and the other end on GPIO 23. #TODO: Diagram
Troubleshooting
Configuring Hook Type
If you find that the behaviors for hanging up and lifting the phone are reversed, it's likely that the hook_type in config.yaml is incorrectly set. Ensure that it matches your phone's hook switch type (NC or NO).
Verify default audio interface
A few users had issues where audio I/O was defaulting to HDMI. To alleviate this, check the following:
Check the Sound Card Configuration
Verify the available sound devices using the following command:
aplay -l
Ensure that your USB audio interface is listed and note the card and device numbers.
Set the Default Sound Card
If you want to route audio through your USB audio interface, you'll need to make it the default sound card.
Edit the ALSA configuration file (usually located at /etc/asound.conf or ~/.asoundrc) and add the following:
defaults.pcm.card X
defaults.ctl.card X
Replace X with the card number of your USB audio interface obtained from the previous step.
Restart ALSA
sudo /etc/init.d/alsa-utils restart
Support
If this code helped you or if you have some feedback, I'd be thrilled to hear about it! Feel like saying thanks? You can buy me a coffee☕.